You don’t need to create custom view to display list in your AlertDialog. AlertDialog has the ability to display different kind of lists itself. Here we will see the 3 different types of methods to display the list in AlertDialog.
1. Simple List
Here we will display simple list in the AlertDialog. Here we need to provide the array of String to the AlertDialog and that’s it, it will handle the rest. We can also add Ok/Cancel button to the list but we won’t need it in the simple list.
We can use this list dialog in place of dropdown list(spinner).
First we declare the String array and then we create the AlertDialog.
String[] listItems = {"one", "two", "three", "four", "five"};

AlertDialog.Builder builder = new AlertDialog.Builder(ListAlertDialogActivity.this);
builder.setTitle("Choose item");

builder.setItems(listItems, new DialogInterface.OnClickListener() {
  @Override
  public void onClick(DialogInterface dialog, int which) {
    Toast.makeText(ListAlertDialogActivity.this, "Position: " + which + " Value: " + listItems[which], Toast.LENGTH_LONG).show();
  }
});

AlertDialog dialog = builder.create();
dialog.show();
The above code will display the list in the dialog like this.
Simple List in AlertDialog
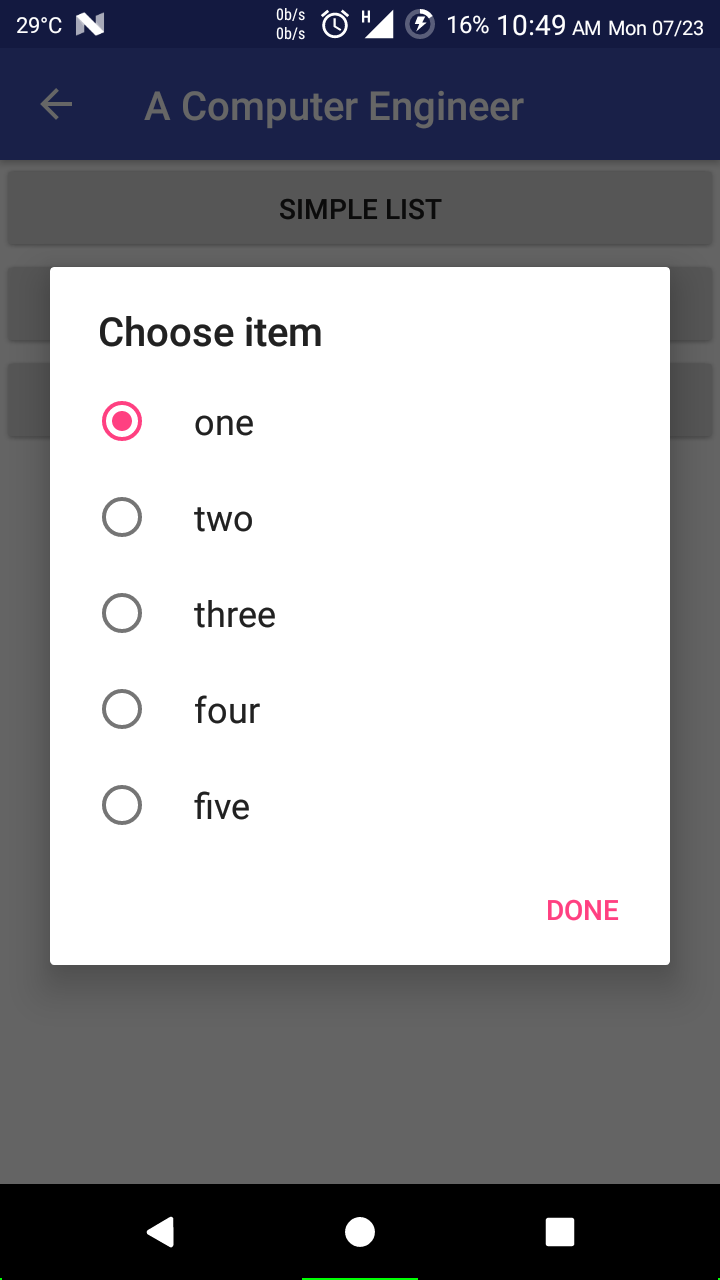
2. Radio Button List
Now we will display list with Radio Button in the AlertDialog. You can use such list when you want to select only 1 item from the list of items. This is similar to the first one in the functionality but the visual representation is different. Here we will add positive button(OK/Done) to confirm the selection once the user select his/her option via Radio Button. Here we use the same String array as previous one.
We can use this list dialog in place of dropdown list(spinner).
String[] listItems = {"one", "two", "three", "four", "five"};

AlertDialog.Builder builder = new AlertDialog.Builder(ListAlertDialogActivity.this);
builder.setTitle("Choose item");

int checkedItem = 0; //this will checked the item when user open the dialog
builder.setSingleChoiceItems(listItems, checkedItem, new DialogInterface.OnClickListener() {
  @Override
  public void onClick(DialogInterface dialog, int which) {
    Toast.makeText(ListAlertDialogActivity.this, "Position: " + which + " Value: " + listItems[which], Toast.LENGTH_LONG).show();
  }
});

builder.setPositiveButton("Done", new DialogInterface.OnClickListener() {
  @Override
  public void onClick(DialogInterface dialog, int which) {
    dialog.dismiss();
  }
});

AlertDialog dialog = builder.create();
dialog.show();
The above code will display the list in the dialog with radio button like this.
Radio Button List in AlertDialog
3. Check Box List
This list is very important as we are going to select multiple items from the list using checkbox. We can use this list in many project where you want to select multiple items. Here we need to add confirmation button(OK/Done) after user selects all the items he/she wants. Here we use the same String array as previous one.
We can also call this a multi-select list or multi select dropdown list.
String[] listItems = {"one", "two", "three", "four", "five"};

AlertDialog.Builder builder = new AlertDialog.Builder(ListAlertDialogActivity.this);
builder.setTitle("Choose items");

boolean[] checkedItems = new boolean[]{true, false, true, false, true}; //this will checked the items when user open the dialog
builder.setMultiChoiceItems(listItems, checkedItems, new DialogInterface.OnMultiChoiceClickListener() {
  @Override
  public void onClick(DialogInterface dialog, int which, boolean isChecked) {
    Toast.makeText(ListAlertDialogActivity.this, "Position: " + which + " Value: " + listItems[which] + " State: " + (isChecked ? "checked" : "unchecked"), Toast.LENGTH_LONG).show();
  }
});

builder.setPositiveButton("Done", new DialogInterface.OnClickListener() {
  @Override
  public void onClick(DialogInterface dialog, int which) {
    dialog.dismiss();
  }
});

AlertDialog dialog = builder.create();
dialog.show();
The above code will display the list in the dialog with radio button like this.
Now we create adapter which holds the ImageView which will go in the grid.
public class ImageGridAdapter extends RecyclerView.Adapter<ImageGridAdapter.GridItemViewHolder> {

  private List<String> imageList;

  private Context c;

  public class GridItemViewHolder extends RecyclerView.ViewHolder {
    SquareImageView siv;

    public GridItemViewHolder(View view) {
      super(view);
      siv = view.findViewById(R.id.siv);
    }
  }

  public ImageGridAdapter(Context c, List imageList) {
    this.c = c;
    this.imageList = imageList;
  }

  @Override
  public GridItemViewHolder onCreateViewHolder(ViewGroup parent, int viewType) {
    View itemView = LayoutInflater.from(parent.getContext()).inflate(R.layout.item_grid, parent, false);

    return new GridItemViewHolder(itemView);
  }

  @Override
  public void onBindViewHolder(GridItemViewHolder holder, int position) {
    final String path = imageList.get(position);

    Picasso.get()
        .load(path)
        .resize(250, 250)
        .centerCrop()
        .into(holder.siv);

    holder.siv.setOnClickListener(new View.OnClickListener() {
        @Override
        public void onClick(View v) {
            //handle click event on image
        }
    });
  }

  @Override
  public int getItemCount() {
    return imageList.size();
  }

}
Here I used Picasso library to display image, if you want to integrate it in your project then please check their web page: http://square.github.io/picasso/
Now we will go for the layout we used in above adapter. It just hold single ImageView.
In above code, you must be thinking what is SquareImageView, right? It is the custom view which keeps ImageView square in the grid. The code for it is given below.
public class SquareImageView extends AppCompatImageView {
  public SquareImageView(Context context) {
    super(context);
  }

  public SquareImageView(Context context, AttributeSet attrs) {
    super(context, attrs);
  }

  public SquareImageView(Context context, AttributeSet attrs, int defStyleAttr) {
    super(context, attrs, defStyleAttr);
  }

  @Override
  protected void onMeasure(int widthMeasureSpec, int heightMeasureSpec) {
    super.onMeasure(widthMeasureSpec, heightMeasureSpec);

    int width = getMeasuredWidth();
    setMeasuredDimension(width, width);
  }
}
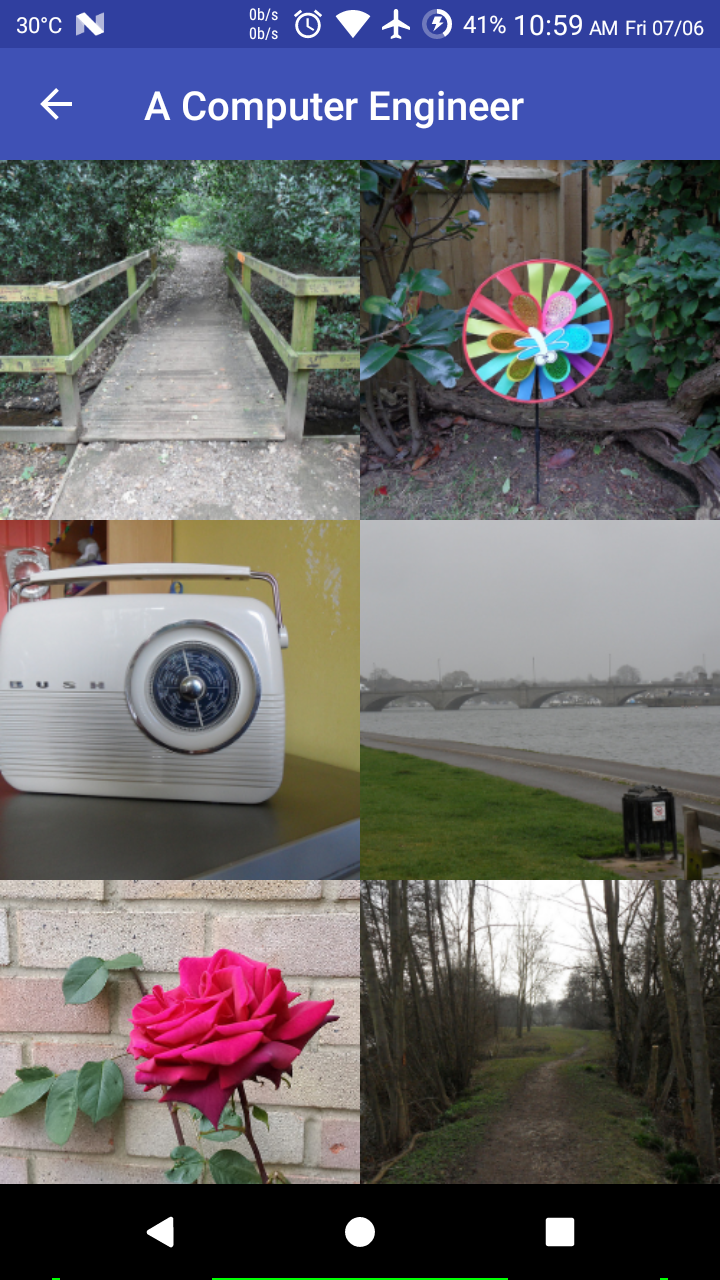
Now we set the above adapter to the RecyclerView so that our Images will be displayed in the grid manner. Here we use images from Flickr public domain. In RecyclerView, we used StaggeredGridLayoutManager which tell the RecyclerView to use the grid like layout with the number of columns provided.
RecyclerView rv = findViewById(R.id.rv);

StaggeredGridLayoutManager sglm = new StaggeredGridLayoutManager(2, StaggeredGridLayoutManager.VERTICAL);
rv.setLayoutManager(sglm);

List<String> imageList = new ArrayList<>();
imageList.add("https://farm5.staticflickr.com/4403/36538794702_83fd8b63b7_c.jpg");
imageList.add("https://farm5.staticflickr.com/4354/35684440714_434610d1d6_c.jpg");
imageList.add("https://farm5.staticflickr.com/4301/35690634410_f5d0e312cb_c.jpg");
imageList.add("https://farm4.staticflickr.com/3854/32890526884_7dc068fedd_c.jpg");
imageList.add("https://farm8.staticflickr.com/7787/18143831616_a239c78056_c.jpg");
imageList.add("https://farm9.staticflickr.com/8745/16657401480_57653ac8b0_c.jpg");
imageList.add("https://farm3.staticflickr.com/2917/14144166232_44613c53c7_c.jpg");
imageList.add("https://farm8.staticflickr.com/7453/13960410788_3dd02b7a02_c.jpg");
imageList.add("https://farm1.staticflickr.com/920/29297133218_de38a7e4c8_c.jpg");
imageList.add("https://farm2.staticflickr.com/1788/42989123072_6720c9608d_c.jpg");
imageList.add("https://farm1.staticflickr.com/888/29062858008_89851766c9_c.jpg");
imageList.add("https://farm2.staticflickr.com/1731/27940806257_8067196b41_c.jpg");
imageList.add("https://farm1.staticflickr.com/884/42745897912_ff65398e38_c.jpg");
imageList.add("https://farm2.staticflickr.com/1829/27971893037_1858467f9a_c.jpg");
imageList.add("https://farm2.staticflickr.com/1822/41996470025_414452d7a0_c.jpg");
imageList.add("https://farm2.staticflickr.com/1793/42937679651_3094ebb2b9_c.jpg");
imageList.add("https://farm1.staticflickr.com/892/42078661914_b940d96992_c.jpg");
ImageGridAdapter iga = new ImageGridAdapter(ImageGridActivity.this, imageList);
rv.setAdapter(iga);
Please add 2 strings ‘facebook_app_id’ and ‘fb_login_protocol_scheme’ from your Facebook app. You will already have ‘app_name’ string created in your project by Android Studio.
Now add this 2 line in your Application class(the class extending Application).
Draw circle shape in canvas is very easy thing to do if you are familiar with Canvas in Android. Please checkout this tutorial if you don’t know about how to create basic Canvas, display it to ImageView and save it as Bitmap.
Here we draw one canvas of 500×500 resolution and draw circle shape in the middle of the canvas.
The below line will draw circle shape in canvas.
canvas.drawCircle(x, y, radius, paint);
Here we pass x and y as the center coordinats of the circle. radius represents the radius of the circle being drawn. And paint is the Paint for drawing circle.
Now we will write the full code to draw circle in canvas.
This article depicts the CRUD(create, read, update, delete) functions on a database table in SQLite. Here I take the example of ‘user’ class which has few properties.
CRUD in SQLite
First you need to create User class with its constructor and getter-setter methods.
public class User {
  private long id;
  private String firstName;
  private String lastName;
  private int age;

  public User() {
  }

  public long getId() {
    return id;
  }

  public void setId(long id) {
    this.id = id;
  }

  public String getFirstName() {
    return firstName;
  }

  public void setFirstName(String firstName) {
    this.firstName = firstName;
  }

  public String getLastName() {
    return lastName;
  }

  public void setLastName(String lastName) {
    this.lastName = lastName;
  }

  public int getAge() {
    return age;
  }

  public void setAge(int age) {
    this.age = age;
  }
}
Now we will initialize DataBaseHelper class which will perform all the database related operation.
First we initial DatabaseHelper class by extending SQLiteOpenHelper.
public class DatabaseHelperNew extends SQLiteOpenHelper {

  @Override
  public void onCreate(SQLiteDatabase db) {

  }

  @Override
  public void onUpgrade(SQLiteDatabase db, int oldVersion, int newVersion) {

  }

  public DatabaseHelperNew(Context c) {
    super(context, "db_name"/*db name*/, null, 1/*version*/);
  }
}
Now we initialize onCreate and onUpgrade methods with appropriate queries.
//create user
public long createUser(User u) {
  SQLiteDatabase db = this.getWritableDatabase();
  ContentValues values = new ContentValues();
  values.put(KEY_USER_FIRSTNAME, u.getFirstName());
  values.put(KEY_USER_LASTNAME, u.getLastName());
  values.put(KEY_USER_AGE, u.getAge());
  long id = db.insert(TABLE_USER, null, values);
  db.close();
  return id;
}
Update
//update user
public void updateUser(User u) {
  SQLiteDatabase db = this.getWritableDatabase();
  ContentValues values = new ContentValues();
  values.put(KEY_USER_FIRSTNAME, u.getFirstName());
  values.put(KEY_USER_LASTNAME, u.getLastName());
  values.put(KEY_USER_AGE, u.getAge());
  db.update(TABLE_USER, values, KEY_USER_ID + " = ?", new String[]{String.valueOf(u.getId())});
  db.close();
}
Delete
//delete user
public void deleteUser(User u){
  SQLiteDatabase db = this.getWritableDatabase();
  db.delete(TABLE_USER, KEY_USER_ID + " = ?", new String[]{String.valueOf(u.getId())});
  db.close();
}
Read
//read all users
public ArrayList<User> readUsers(){
  ArrayList<User> users = new ArrayList<>();
  String selectQuery = "SELECT * FROM " + TABLE_USER;
  SQLiteDatabase db = this.getReadableDatabase();
  Cursor c = db.rawQuery(selectQuery, null);

  if (c.moveToFirst()) {
    do {
      User u = new User();
      u.setId(c.getInt((c.getColumnIndex(KEY_USER_ID))));
      u.setFirstName(c.getString(c.getColumnIndex(KEY_USER_FIRSTNAME)));
      u.setLastName(c.getString(c.getColumnIndex(KEY_USER_LASTNAME)));
      u.setAge(c.getInt(c.getColumnIndex(KEY_USER_AGE)));
      users.add(u);
    } while (c.moveToNext());
  }
  db.close();
  return users;
}

//read single user
public User readUser(long id){
  ArrayList<User> users = new ArrayList<>();
  String selectQuery = "SELECT * FROM " + TABLE_USER + " WHERE " + KEY_USER_ID + " = ?";
  SQLiteDatabase db = this.getReadableDatabase();
  Cursor c = db.rawQuery(selectQuery, new String[]{String.valueOf(id)});

  if (c.moveToFirst()) {
    do {
      User u = new User();
      u.setId(c.getInt((c.getColumnIndex(KEY_USER_ID))));
      u.setFirstName(c.getString(c.getColumnIndex(KEY_USER_FIRSTNAME)));
      u.setLastName(c.getString(c.getColumnIndex(KEY_USER_LASTNAME)));
      u.setAge(c.getInt(c.getColumnIndex(KEY_USER_AGE)));
      users.add(u);
    } while (c.moveToNext());
  }
  db.close();
  return users.get(0);
}
Now the complete DatabaseHelper file looks like below.
public class DatabaseHelper extends SQLiteOpenHelper {

  static String TABLE_USER = "user";
  static String KEY_USER_ID = "user_id";
  static String KEY_USER_FIRSTNAME = "user_first_name";
  static String KEY_USER_LASTNAME = "user_last_name";
  static String KEY_USER_AGE = "user_age";

  String CREATE_TABLE_USER = "CREATE TABLE " + TABLE_USER + "(" + KEY_USER_ID + " INTEGER PRIMARY KEY," + KEY_USER_FIRSTNAME + " TEXT," + KEY_USER_LASTNAME + " TEXT," + KEY_USER_AGE + " INTEGER" + ")";

  @Override
  public void onCreate(SQLiteDatabase db) {
    db.execSQL(CREATE_TABLE_USER);
  }

  @Override
  public void onUpgrade(SQLiteDatabase db, int oldVersion, int newVersion) {
    db.execSQL("DROP TABLE IF EXISTS " + TABLE_USER);
    onCreate(db);
  }

  public DatabaseHelper(Context c) {
    super(c, "db_name"/*db name*/, null, 1/*version*/);
  }

  //create user
  public long createUser(User u) {
    SQLiteDatabase db = this.getWritableDatabase();
    ContentValues values = new ContentValues();
    values.put(KEY_USER_FIRSTNAME, u.getFirstName());
    values.put(KEY_USER_LASTNAME, u.getLastName());
    values.put(KEY_USER_AGE, u.getAge());
    long id = db.insert(TABLE_USER, null, values);
    db.close();
    return id;
  }

  //update user
  public void updateUser(User u) {
    SQLiteDatabase db = this.getWritableDatabase();
    ContentValues values = new ContentValues();
    values.put(KEY_USER_FIRSTNAME, u.getFirstName());
    values.put(KEY_USER_LASTNAME, u.getLastName());
    values.put(KEY_USER_AGE, u.getAge());
    db.update(TABLE_USER, values, KEY_USER_ID + " = ?", new String[]{String.valueOf(u.getId())});
    db.close();
  }

  //delete user
  public void deleteUser(User u){
    SQLiteDatabase db = this.getWritableDatabase();
    db.delete(TABLE_USER, KEY_USER_ID + " = ?", new String[]{String.valueOf(u.getId())});
    db.close();
  }

  //read all users
  public ArrayList<User> readUsers(){
    ArrayList<User> users = new ArrayList<>();
    String selectQuery = "SELECT * FROM " + TABLE_USER;
    SQLiteDatabase db = this.getReadableDatabase();
    Cursor c = db.rawQuery(selectQuery, null);

    if (c.moveToFirst()) {
      do {
        User u = new User();
        u.setId(c.getInt((c.getColumnIndex(KEY_USER_ID))));
        u.setFirstName(c.getString(c.getColumnIndex(KEY_USER_FIRSTNAME)));
        u.setLastName(c.getString(c.getColumnIndex(KEY_USER_LASTNAME)));
        u.setAge(c.getInt(c.getColumnIndex(KEY_USER_AGE)));
        users.add(u);
      } while (c.moveToNext());
    }
    db.close();
    return users;
  }

  //read single user
  public User readUser(long id){
    ArrayList<User> users = new ArrayList<>();
    String selectQuery = "SELECT * FROM " + TABLE_USER + " WHERE " + KEY_USER_ID + " = ?";
    SQLiteDatabase db = this.getReadableDatabase();
    Cursor c = db.rawQuery(selectQuery, new String[]{String.valueOf(id)});

    if (c.moveToFirst()) {
      do {
        User u = new User();
        u.setId(c.getInt((c.getColumnIndex(KEY_USER_ID))));
        u.setFirstName(c.getString(c.getColumnIndex(KEY_USER_FIRSTNAME)));
        u.setLastName(c.getString(c.getColumnIndex(KEY_USER_LASTNAME)));
        u.setAge(c.getInt(c.getColumnIndex(KEY_USER_AGE)));
        users.add(u);
      } while (c.moveToNext());
    }
    db.close();
    return users.get(0);
  }

  //user class
  public class User {
    private long id;
    private String firstName;
    private String lastName;
    private int age;

    public User() {
    }

    public long getId() {
      return id;
    }

    public void setId(long id) {
      this.id = id;
    }

    public String getFirstName() {
      return firstName;
    }

    public void setFirstName(String firstName) {
      this.firstName = firstName;
    }

    public String getLastName() {
      return lastName;
    }

    public void setLastName(String lastName) {
      this.lastName = lastName;
    }

    public int getAge() {
      return age;
    }

    public void setAge(int age) {
      this.age = age;
    }
  }
}
Now we will take a look at how to use above class to perform various database operation.
DatabaseHelper dh;
User u;

dh = new DatabaseHelper(MainActivity.this);
u = dh.new User();

u.setFirstName("John");
u.setLastName("Doe");
u.setAge(25);

//create user
long id = dh.createUser(u);

u.setId(id);
//update user
u.setAge(30);
dh.updateUser(u);

//read all users
ArrayList<User> alUser = dh.readUsers();

//read single user
User u1 = dh.readUser(u.getId());

//delete user
dh.deleteUser(u);
You can draw different type of line on Canvas in Android. You can change it’s color, stroke, effect, etc. Here we will see the basics of drawing line on Canvas.
When we use different font in our Android app, it is necessary to use the same font throughout the application. So you have to change the font in the toolbar(action bar).
For that you have to create TextView and set the TypeFace(font) of your choice to that TextView and set it to the action bar as custom view. Checkout the below code for the same.
TextView tv = new TextView(getApplicationContext());
RelativeLayout.LayoutParams lp = new RelativeLayout.LayoutParams(ActionBar.LayoutParams.WRAP_CONTENT, ActionBar.LayoutParams.WRAP_CONTENT);
tv.setLayoutParams(lp);
tv.setText("Welcome!);
tv.setTextSize(20);
tv.setTextColor(Color.parseColor("#FFFFFF"));
Typeface tf = Typeface.createFromAsset(getAssets(), "Asap-Medium.otf");
tv.setTypeface(tf);
getSupportActionBar().setDisplayOptions(ActionBar.DISPLAY_SHOW_CUSTOM);
getSupportActionBar().setCustomView(tv);
The above code will create black border with 5dp thickness. You can change thickness using ‘width’ parameter and color using ‘color’ parameter in above code.
Sample code to apply above border to a RelativeLayout. Here we assume that the name of above file is border.xml in drawable folder.
When open the profile page of any person or group in Whatsapp, you will find that the color of the toolbar at top uses the color from the DP of the user or group. It looks good when you use extracted colors from image in your layout. Your layout will blend with the image and other content.
So here we can extract different colors from any image(bitmap) used in our application and use those colors effectively in our app throughout.
Main Color Profiles
First of all there are main 6 type of color profiles in the image that we can extract.
Vibrant
Vibrant Dark
Vibrant Light
Muted
Muted Dark
Muted Light
Most used profile from above are Vibrant and Vibrant Dark. The reason is, vibrant colors are pure, bright, intense, saturated and high chroma color. They stand out in the image and easy to point out. Now if we use those colors in the layout along with the image, it will give a great look. Whatsapp is the best example of it as we discussed earlier.
Every profile(swatch) gives us following information that we can use in the application.
population of that color in image
hue, saturation, lightness
body text color with sufficient contrast with the main color
title text color with sufficient contrast with the main color
Now we look at the code to get the Palette from bitmap.
Bitmap b = null;
b = BitmapFactory.decodeResource(getResources(), R.drawable.img1);
Palette p = Palette.from(b).generate();
Here we get the Palette from image(bitmap). Now we extract main 6 different kind of color profile(swatch) from it.
Now we will extract 4 different values from these swatch as described earlier in the article. Here we will take psVibrant as an example.
int color = psVibrant.getRgb();
int population = psVibrant.getPopulation();
float[] hsl = psVibrant.getHsl();
int bodyTextColor = psVibrant.getBodyTextColor();
int titleTextColor = psVibrant.getTitleTextColor();
You can also get other colors from image other than above 6 by following code snippet.
List<Palette.Swatch> pss;
pss = p.getSwatches();
for(int j = 0; j < pss.size(); j++) {
  Palette.Swatch ps = pss.get(j);
  int color = ps.getRgb();
  int population = ps.getPopulation();
  float[] hsl = ps.getHsl();
  int bodyTextColor = ps.getBodyTextColor();
  int titleTextColor = ps.getTitleTextColor();
}