Add speech recognition to EditText in Android

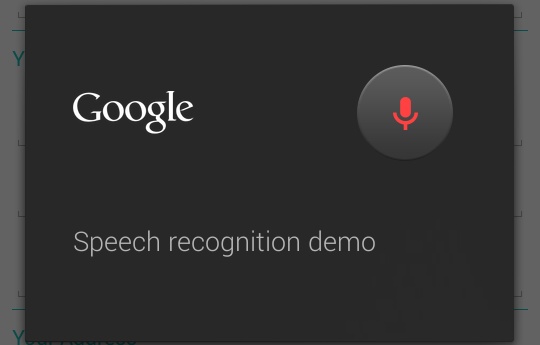
Now a days many android application has the microphone icon on the right side of EditText. When you click on it, it will ask you to speak the words you want to enter into the EditText. After you speak the word to that dialog it will automatically enter those words into the EditText. Here is the screenshot for that.

speech recognition in android

Now to open this dialog, you need to add the below code to your any of the button’s click listener.

int REQUEST_CODE = 1;
String DIALOG_TEXT = "Speech recognition demo";
Intent intent = new Intent(RecognizerIntent.ACTION_RECOGNIZE_SPEECH);
intent.putExtra(RecognizerIntent.EXTRA_PROMPT, DIALOG_TEXT);
intent.putExtra(RecognizerIntent.EXTRA_LANGUAGE_MODEL, 
                   RecognizerIntent.LANGUAGE_MODEL_FREE_FORM);
intent.putExtra(RecognizerIntent.EXTRA_MAX_RESULTS, REQUEST_CODE);
intent.putExtra(RecognizerIntent.EXTRA_LANGUAGE, "en-US");
startActivityForResult(intent, requestCode);

Now when you click the button this dialog will be open and you can speak to it. Then it will store your speech and return it to you in onActivityResult method as String. Check the following code for it.

String resultSpeech = "";
@Override
protected void onActivityResult(int requestCode, int resultcode, Intent intent) {
    super.onActivityResult(requestCode, resultcode, intent);
    ArrayList<String> speech;
    if (resultcode == RESULT_OK) {  
        if (requestCode == REQUEST_CODE) {
            speech = intent.getStringArrayListExtra(RecognizerIntent.EXTRA_RESULTS);
            resultSpeech = speech.get(0);
            //you can set resultSpeech to your EditText or TextView
        }
    }
}

Post your queries or questions in comment.

Add “Share Image to Whatsapp” button in Android

In android we can use the default share intent to share our image to the app installed in our app(code is given below), but many times we only need specific application like whatsapp, Facebook, twitter, gmail, etc. So for that we need to do little modification in default intent for sharing.

Default sharing intent in android

    Intent share = new Intent(Intent.ACTION_SEND);
    share.setType("image/jpeg");
    share.putExtra(Intent.EXTRA_STREAM, Uri.parse("file:///sdcard/path-to-your-image.jpg"));
    startActivity(Intent.createChooser(share, "Share Image"));

Now if we want to share this image only to any specific app like here is whatsapp, then we need to add filter that provides package name of the app. See the code below.

Intent share = new Intent(Intent.ACTION_SEND);
share.setType("image/jpeg");
share.putExtra(Intent.EXTRA_STREAM, Uri.parse("file:///sdcard/path-to-your-image.jpg"));
share.setPackage("com.whatsapp");//package name of the app
startActivity(Intent.createChooser(share, "Share Image"));

Now you can set package name of any app that can able to share image like Facebook, twitter, gmail, etc.

Download Source Code: https://github.com/dakshbhatt21/a-computer-engineer

Add “Rate This App” button to your Android App

Many time in out Android app, we need to open our page on Google Play Store within the app. And it is also helpful to encourage people to rate our application. So we can put a button or dialog in our app that user can use to rate our app on Google Play Store.

For that first we check that if the user device has the play store installed in their device or not. Because many device and tablets does not have play store app in their device. So we will use try catch here so if the Play Store is not available we can open the app in browser from catch part.

try {
  startActivity(new Intent(Intent.ACTION_VIEW, 
      Uri.parse("market://details?id=" + getPackageName())));
} 
catch (android.content.ActivityNotFoundException anfe) {
  startActivity(new Intent(Intent.ACTION_VIEW, 
      Uri.parse("http://play.google.com/store/apps/details?id=" + getPackageName())));
}

Now if the device has the play store, we will directly open our app in play store app. If the play store are not found in the device it will open in browser. If you have more than one browser, it will prompt you to choose one.

startActivity(new Intent(Intent.ACTION_VIEW, 
      Uri.parse("http://play.google.com/store/apps/details?id=" + getPackageName())));

Here is the full code that you can use in your button onClick event.

btnRateApp.setOnClickListener(new OnClickListener() {
  @Override
  public void onClick(View v) {
    try {
      startActivity(new Intent(Intent.ACTION_VIEW, 
        Uri.parse("market://details?id=" + getPackageName())));
    } 
    catch (android.content.ActivityNotFoundException anfe) {
      startActivity(new Intent(Intent.ACTION_VIEW, 
        Uri.parse("http://play.google.com/store/apps/details?id=" + getPackageName())));
    }
  }
});

I also make a function that you can include in your file and call it from any onClick event of button, make sure you pass the package name as argument.

public void rateApp(String packageName) {
  try {
    startActivity(new Intent(Intent.ACTION_VIEW, 
      Uri.parse("market://details?id=" + packageName)));
  } 
  catch (android.content.ActivityNotFoundException anfe) {
    startActivity(new Intent(Intent.ACTION_VIEW, 
      Uri.parse("http://play.google.com/store/apps/details?id=" + packageName)));
  }
}

Check if internet is available in Android

Many time in the Android app we need to fetch data from any webservices in JSON or XML or in any other format but during unavailability of internet we need to display specific message like no internet available or show offline data.

For that we need to use ConnectivityManager system service as follows.

ConnectivityManager cm = (ConnectivityManager) con.getSystemService(Context.CONNECTIVITY_SERVICE);

Then we can get network information from above ConnectivityManager as follows using NetworkInfo.

NetworkInfo ni = cm.getActiveNetworkInfo();

Now this NetworkInfo have the following network states displyed in following table.

NetworkInfo.State CONNECTED
NetworkInfo.State CONNECTING
NetworkInfo.State DISCONNECTED
NetworkInfo.State DISCONNECTING
NetworkInfo.State SUSPENDED
NetworkInfo.State UNKNOWN

Now we have to check for the connected state of the network.

ni.getState() == NetworkInfo.State.CONNECTED;

From the above conclusion, finally we have come up with the following function that directly checks for the availability of the internet.

public boolean isNetworkAvailable() {
	ConnectivityManager cm = (ConnectivityManager) getApplicationContext().getSystemService(Context.CONNECTIVITY_SERVICE);
	NetworkInfo ni = cm.getActiveNetworkInfo();
	return ni != null && ni.getState() == NetworkInfo.State.CONNECTED;
}

Turn on and turn off flash light programmatically in Android

Most of times we need to use flash light of our Android device as torch so we have to start camera or other application. But Android provide access to the camera flash in our application so you can turn it on and off using code. Here I’ll show you how to turn on and off it programmatically.

First of all we need to check if the device has the flash light or not. For that we use following condition from PackageManager.

Here is the function for turn on the flash light.

Camera cam = null;
public void turnOnFlashLight() {
    try {
        if (getPackageManager().hasSystemFeature(PackageManager.FEATURE_CAMERA_FLASH)) {
            cam = Camera.open();
            Parameters p = cam.getParameters();
            p.setFlashMode(Parameters.FLASH_MODE_TORCH);
            cam.setParameters(p);
            cam.startPreview();
        }
    } catch (Exception e) {
        e.printStackTrace();
        Toast.makeText(getBaseContext(), "Exception throws in turning on flashlight.", Toast.LENGTH_SHORT).show();
    }
}

And to turn of flashlight use following piece of code.

public void turnOffFlashLight() {
    try {
        if (getPackageManager().hasSystemFeature(PackageManager.FEATURE_CAMERA_FLASH)) {
            cam.stopPreview();
            cam.release();
            cam = null;
        }
    } catch (Exception e) {
        e.printStackTrace();
        Toast.makeText(getBaseContext(), "Exception throws in turning off flashlight.", Toast.LENGTH_SHORT).show();
    }
}

Here we use Camera class for flashlight.

Here we need to add the following permission to the manifest file. The last one is not generally used in 3rd party apps, it is just use for testing in system apps as per docs.

<uses-permission android:name="android.permission.CAMERA" />
<uses-permission android:name="android.permission.FLASHLIGHT"/>
<uses-permission android:name="android.permission.HARDWARE_TEST" />

Here you can download full code from github: Flashligh Demo

You can download demo app from Google Play: Flashlight Demo

Get name of the month from the number of the month Java

Many times we need to use month name to display date in well formed manner. I encounter this issue while developing Android application that use Android datepicker. It returns me the number of the month between 0 to 11 [I thought it would be 1-12]. But for display I need the name of the month.

For that I found one Java class that can convert integer number to name [I am too lazy to write an array that can do the work for me]. And the class DateFormatSymbols can convert it the following way. I just made a method so everyone[like me !!!] can copy-paste it to their project.

public String getMonthForInt(int num) {
    String month = "wrong";
    DateFormatSymbols dfs = new DateFormatSymbols();
    String[] months = dfs.getMonths();
    if (num >= 0 && num <= 11 ) {
        month = months[num];
    }
    return month.toLowerCase();
}

How to check current sound profile in Android

Many times in Android development, we need to check the current sound profile. Like it is in normal mode, vibrate mode or silent mode. So for that in Android, they provide AudioManager class which have method that return the current sound profile. Below is the example of it.

AudioManager profileCheck = (AudioManager)getSystemService(Context.AUDIO_SERVICE);

if (profileCheck.getRingerMode() == AudioManager.RINGER_MODE_NORMAL)
    Toast.makeText(getApplicationContext(), "Normal", Toast.LENGTH_LONG).show();
else if (profileCheck.getRingerMode() == AudioManager.RINGER_MODE_VIBRATE)
    Toast.makeText(getApplicationContext(), "Vibrate", Toast.LENGTH_LONG).show();
else if (profileCheck.getRingerMode() == AudioManager.RINGER_MODE_SILENT)
    Toast.makeText(getApplicationContext(), "Silent", Toast.LENGTH_LONG).show();

According to the sound profile you can manage your further actions.

Validation in Java/Android

Many time during my Android development, I need to verify email address, username, password or any specific requirements. Most of times it needs when I am building registration form or login form. So I made the function that takes first argument as string on which validation is needed and pattern [Regular Expression] that decides first argument is valid or invalid.

Here I use two main java class

Here Pattern class compile the regular expression and then Matcher class perform match operation against given String using compiled pattern. Here is the function for that.

	public Boolean validate(String text, String regex)	{
		Pattern pattern;	
		Matcher matcher;
		pattern = Pattern.compile(regex);
    	matcher = pattern.matcher(text);
    	if(matcher.matches())	{
    		return true;
    	}
    	else	{
    		return false;
    	}
	}

Here you can see that the function validate validates the String text against the regex using Pattern and Matcher class. I attached the example of email validation below, but you can use any validation by just providing their regular expression.

Download example of email validation with comments here : https://www.mediafire.com/view/vgw8pdf5db9ygzu/Validation.java

References :

Set the wallpaper from code in Android

During android application you may need to set wallpaper using code, then you have to use following method.

public void setStream (InputStream data)

For that you need to include the following permission to your menifest file.

<uses-permission android:name="android.permission.SET_WALLPAPER"></uses-permission>

I’ve made the method that will directly set the wallpaper image specified in argument.

public void setWallpaper(String pathToImage)    {
    try {
        WallpaperManager wpm = WallpaperManager.getInstance(getApplicationContext());
	    InputStream ins = new URL("file://" + pathToImage).openStream();
	    wpm.setStream(ins);
	    Toast.makeText(getApplicationContext(), "Wallpaper has been set", Toast.LENGTH_SHORT).show();            
    } 
    catch (MalformedURLException e) {
        e.printStackTrace();
    } 
    catch (IOException e) {
        e.printStackTrace();
    }     
}

Here we have to specify “file://” which specify the protocol which we use here. We can also use http, ftp, etc. Otherwise it throws “java.net.MalformedURLException: Protocol not found: ” exception.

Get Date and Time in Android

In Android, to get time and date you have to first create the object of calender then you can format it using simpledateformat class according to your need. At last it returns you a date and time as per your format in String return type.

Here is the sample code for getting date and time as string.

Code :

public String getDateTime()	{
	Calendar c = Calendar.getInstance(); 
	SimpleDateFormat df = new SimpleDateFormat("dd-MM-yyyy HH:mm:ss");
	return df.format(c.getTime());
}